It seems I was too eager with my stylized fog effect in my previous post. When I added a fly-through script on my camera (which I hadn't done before writing the previous post) it quickly showed something was wrong:
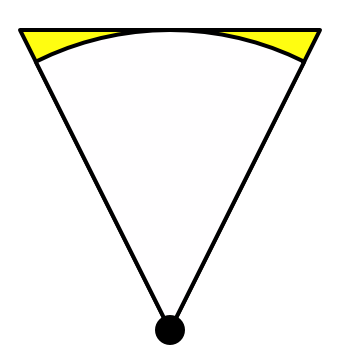
As you can see in the above image, the gradient moves on the terrain as you turn around. This is a typical side-effect of a depth based fog (which is standard).
Normally with a single color and a good fog distance this isn't too bad, but because we introduced the gradient this side-effect becomes really apparent. In a side scrolling context this is not much of an issue, since you don't turn around. But often you're turning your head so we desire distance based fog. The above image and the ins and outs of fog come from this excellent tutorial so check that out for more details.
I got a lot of inspiration from the now deprecated "Global Fog" post process effect from Unity. Both that script and the tutorial from catlike coding explain how to implement distance based fog. So we implement this with the PostFX v2 system. First, pass the frustum corners to the shader:
public override void Render(PostProcessRenderContext context)
{
 //...

 Camera cam = context.camera;
 Transform camtr = cam.transform;

 Vector3[] frustumCorners = new Vector3[4];
 cam.CalculateFrustumCorners(new Rect(0, 0, 1, 1),
  cam.farClipPlane, cam.stereoActiveEye, frustumCorners);

 Matrix4x4 frustumVectorsArray = Matrix4x4.identity;
 frustumVectorsArray.SetRow(0, frustumCorners[0]);
 frustumVectorsArray.SetRow(1, frustumCorners[3]);
 frustumVectorsArray.SetRow(2, frustumCorners[1]);
 frustumVectorsArray.SetRow(3, frustumCorners[2]);

 sheet.properties.SetMatrix("_FrustumCorners", frustumVectorsArray);
 sheet.properties.SetVector("_CameraWS", camtr.position);

 //...
}
In the vertex program select the correct corner to have it interpolated:
struct v2f
{
 float4 vertex : SV_POSITION;
 float2 texcoord : TEXCOORD0;
 float2 texcoordStereo : TEXCOORD1;
 float4 ray : TEXCOORD2;
};

v2f Vert(AttributesDefault v)
{
 v2f o;

 // ...

 i.ray = _FrustumCorners[o.texcoord.x + 2 * o.texcoord.y];

 return o;
}
And then use that in the fragment shader:
float4 Frag(v2f i) : SV_Target
{
 half4 color = SAMPLE_TEXTURE2D(_MainTex, sampler_MainTex, i.texcoordStereo);
 float depth = SAMPLE_DEPTH_TEXTURE(_CameraDepthTexture, sampler_CameraDepthTexture, i.texcoordStereo);
 depth = Linear01Depth(depth);

 //float dist = ComputeFogDistance(depth);
 float dist = length(depth * i.ray);

 half fog = 1.0 - ComputeFog(dist);
 half gradientSample = 1.0 - ComputeFog(dist * _Spread);
 half4 fogColor = SAMPLE_TEXTURE2D(_FogGradient, sampler_FogGradient, gradientSample);
 return lerp(color, fogColor, fog * fogColor.a);
}
Easy enough, right? Or so I thought. This did not work at all! For some reason the interpolated rays were incorrect in the fragment shader. I spent the rest of the day with debug rendering, comparing results between the GlobalFog effect and mine, but I failed to find why interpolation seemed broken.
After a good night's sleep (solutions are always found after a good night's sleep) I decided to dig into the source code of the PostFX system. It never occurred to me before that at the end of the Render call in my effect it says "BlitFullscreenTriangle", where in all other legacy post fx examples it says "Blit". In the source code it literally says:
// Use a custom blit method to draw a fullscreen triangle instead of a fullscreen quad
// https://michaldrobot.com/2014/04/01/gcn-execution-patterns-in-full-screen-passes/
Right, ok, that explains a lot, we're not interpolating a quad but a triangle that covers the entire viewport, which is apparently more cache friendly and thus faster. The coordinates look like this:
Where we used to have four vertices between -1 and 1 on both axes we now have a triangle between -1 and 3. Thus we change the provided corners:
public override void Render(PostProcessRenderContext context)
{
 //...

 Camera cam = context.camera;
 Transform camtr = cam.transform;

 Vector3[] frustumCorners = new Vector3[4];
 cam.CalculateFrustumCorners(new Rect(0, 0, 1, 1),
  cam.farClipPlane, cam.stereoActiveEye, frustumCorners);
 var bottomLeft = camtr.TransformVector(frustumCorners[1]);
 var topLeft = camtr.TransformVector(frustumCorners[0]);
 var bottomRight = camtr.TransformVector(frustumCorners[2]);

 Matrix4x4 frustumVectorsArray = Matrix4x4.identity;
 frustumVectorsArray.SetRow(0, bottomLeft);
 frustumVectorsArray.SetRow(1, bottomLeft + (bottomRight - bottomLeft) * 2);
 frustumVectorsArray.SetRow(2, bottomLeft + (topLeft - bottomLeft) * 2);

 sheet.properties.SetMatrix("_FrustumVectorsWS", frustumVectorsArray);

 //...
}
We select the correct corner via the vertex coordinates:
v2f Vert(AttributesDefault v)
{
 v2f o;
 //...
 int index = (o.texcoord.x / 2) + o.texcoord.y;
 o.ray = _FrustumVectorsWS[index];
 //...
 return o;
}
And done! When we now look around us the fog stays the same:
If you looked closely you've also seen some height fog in the gifs, I'm still working on that but expect another update soon on that topic :)


