This post has moved to my new website. Click here to read it there.
28 March 2019

20 January 2019
22 October 2018
Smart (shared) pointers or dumb pointers?
A few days ago someone asked me why I was teaching students the use of smart pointers. The code of the students was considered "bad" because they had used smart pointers. In that same week, other students asked me what they should use: smart pointers or raw pointers.
I defended my point of view on smart pointers, but my modus vivendi is to always question yourself. So am I right? Are smart pointers a good tool in our toolbox as game programmers or should they be avoided at all times? When we see them, should we run away in terror or should we consider it good design (if well used)?
The community's opinion
There's definitely been a shift in the mindset of the gamedev community. Googling for "smart pointers in game development" brought me upon several threads at gamedev.net on the topic, in chronological order:
In the 2012 thread, it's clear that C++11 is just new and people are still questioning the standard. But in the 2016 thread people actually defend the standard.
The standard
Recently there's something known as the "C++ Core Guidelines", a collection of code guidelines for C++ written by people that are knowledgeable about C++, edited by Herb Sutter and Bjarne Stroustrup. When we look at the chapter about resource management, we see that the use of smart pointers is encouraged.
- R.20: "Use unique_ptr or shared_ptr to represent ownership". Ok that's clear, when we want to think about ownership, use those pointer types.
- R.10 and R.11 are clear: avoid using malloc/free and new/delete. Why? Because we all know that we should use RAII, and memory is a resource, so it should be wrapped in a RAII wrapper. Enter the smart pointers.
- R.3: "A raw pointer (a T*) is non-owning"
Why is it up for discussion?
In game development we deeply care for memory access patterns because it can heavily impact the performance of our algorithms, as I have shown in this previous blog post. The fear of smart pointers is mostly about the shared_ptr, because that one needs to keep a reference counter in memory somewhere. When an extra shared pointer to a given object is created, the reference counter should be increased (and when the pointer is released, decreased) which causes a memory access we don't want. Indeed, from Scott Meyers' Effective Modern C++:
- std::shared_ptrs are twice the size of a raw pointer.
- Memory for the reference count must be dynamically allocated.
- Increments and decrements of the reference count must be atomic.
But, as Scott Meyers points out, most of the time we use move construction when creating a shared pointer (a c++11 feature), thus removing overhead 3. Creating the control block can be considered free as long as you use "make_shared". Dereferencing a shared_ptr is the same as dereferencing a raw pointer (so use that).
The exact ins and outs of smart (shared) pointers and the possible performance impact they have is discussed in this very detailed talk on smart pointers by Nicolai M. Josuttis at NDC 2015. He describes in detail what exactly the cost is. There is a memory overhead of 12-20 bytes, depending on the usage, and in multi threaded applications there is an overhead in updating the reference counter. Updating the reference counter must happen atomic as Scott Meyers writes, but that can introduce stalls in the CPU's store buffer. Nicolai illustrates this in his talk and the impact is astonishing. However as long as you don't copy the smart pointers by value, there is no noteworthy cost.
In GotW #91 Herb Sutter gives these two guidelines:
- Guideline: Don’t pass a smart pointer as a function parameter unless you want to use or manipulate the smart pointer itself, such as to share or transfer ownership.
- Guideline: Prefer passing objects by value, *, or &, not by smart pointer.
This translates in the Core guidelines as
- R.30: Take smart pointers as parameters only to explicitly express lifetime semantics
My conclusion
Is often this one: use the right tool for the right job (and know how to use it!). Indeed there are potential costs to std::shared_ptr, ones we don't like in game development. As seen in the tests, this happens most often when shared pointers are copied by value. That's why we teach our students to pass these by reference, just like strings. What I learned here is R.30, only pass these smart pointers when you're manipulating their lifetime. Raw pointers and references can and should be used when lifetime is not an issue.
If we're not working on the hot code path, we want the safety and correctness these smart pointers give. And yet again: profile, before you optimize. Be sure that there is a performance impact before you start to remove features in favor of "optimization".
Know the difference between the various types of pointers and use them for their intended purpose. I hope this post gives you some links to resources that help you with just that.
04 August 2018
More foggy adventures
It seems I was too eager with my stylized fog effect in my previous post. When I added a fly-through script on my camera (which I hadn't done before writing the previous post) it quickly showed something was wrong:

As you can see in the above image, the gradient moves on the terrain as you turn around. This is a typical side-effect of a depth based fog (which is standard).
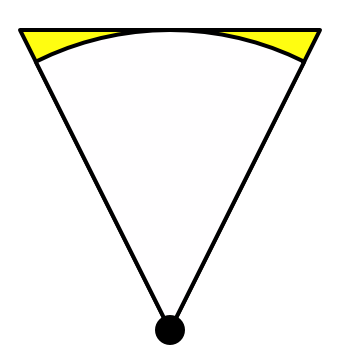
Flat depth vs distance
Normally with a single color and a good fog distance this isn't too bad, but because we introduced the gradient this side-effect becomes really apparent. In a side scrolling context this is not much of an issue, since you don't turn around. But often you're turning your head so we desire distance based fog. The above image and the ins and outs of fog come from this excellent tutorial so check that out for more details.
I got a lot of inspiration from the now deprecated "Global Fog" post process effect from Unity. Both that script and the tutorial from catlike coding explain how to implement distance based fog. So we implement this with the PostFX v2 system. First, pass the frustum corners to the shader:
public override void Render(PostProcessRenderContext context)
{
 //...

 Camera cam = context.camera;
 Transform camtr = cam.transform;

 Vector3[] frustumCorners = new Vector3[4];
 cam.CalculateFrustumCorners(new Rect(0, 0, 1, 1),
  cam.farClipPlane, cam.stereoActiveEye, frustumCorners);

 Matrix4x4 frustumVectorsArray = Matrix4x4.identity;
 frustumVectorsArray.SetRow(0, frustumCorners[0]);
 frustumVectorsArray.SetRow(1, frustumCorners[3]);
 frustumVectorsArray.SetRow(2, frustumCorners[1]);
 frustumVectorsArray.SetRow(3, frustumCorners[2]);

 sheet.properties.SetMatrix("_FrustumCorners", frustumVectorsArray);
 sheet.properties.SetVector("_CameraWS", camtr.position);

 //...
}
In the vertex program select the correct corner to have it interpolated:
struct v2f
{
 float4 vertex : SV_POSITION;
 float2 texcoord : TEXCOORD0;
 float2 texcoordStereo : TEXCOORD1;
 float4 ray : TEXCOORD2;
};

v2f Vert(AttributesDefault v)
{
 v2f o;

 // ...

 i.ray = _FrustumCorners[o.texcoord.x + 2 * o.texcoord.y];

 return o;
}
And then use that in the fragment shader:
float4 Frag(v2f i) : SV_Target
{
 half4 color = SAMPLE_TEXTURE2D(_MainTex, sampler_MainTex, i.texcoordStereo);
 float depth = SAMPLE_DEPTH_TEXTURE(_CameraDepthTexture, sampler_CameraDepthTexture, i.texcoordStereo);
 depth = Linear01Depth(depth);

 //float dist = ComputeFogDistance(depth);
 float dist = length(depth * i.ray);

 half fog = 1.0 - ComputeFog(dist);
 half gradientSample = 1.0 - ComputeFog(dist * _Spread);
 half4 fogColor = SAMPLE_TEXTURE2D(_FogGradient, sampler_FogGradient, gradientSample);
 return lerp(color, fogColor, fog * fogColor.a);
}
Easy enough, right? Or so I thought. This did not work at all! For some reason the interpolated rays were incorrect in the fragment shader. I spent the rest of the day with debug rendering, comparing results between the GlobalFog effect and mine, but I failed to find why interpolation seemed broken.
After a good night's sleep (solutions are always found after a good night's sleep) I decided to dig into the source code of the PostFX system. It never occurred to me before that at the end of the Render call in my effect it says "BlitFullscreenTriangle", where in all other legacy post fx examples it says "Blit". In the source code it literally says:
// Use a custom blit method to draw a fullscreen triangle instead of a fullscreen quad
// https://michaldrobot.com/2014/04/01/gcn-execution-patterns-in-full-screen-passes/
Right, ok, that explains a lot, we're not interpolating a quad but a triangle that covers the entire viewport, which is apparently more cache friendly and thus faster. The coordinates look like this:

Where we used to have four vertices between -1 and 1 on both axes we now have a triangle between -1 and 3. Thus we change the provided corners:
public override void Render(PostProcessRenderContext context)
{
 //...

 Camera cam = context.camera;
 Transform camtr = cam.transform;

 Vector3[] frustumCorners = new Vector3[4];
 cam.CalculateFrustumCorners(new Rect(0, 0, 1, 1),
  cam.farClipPlane, cam.stereoActiveEye, frustumCorners);
 var bottomLeft = camtr.TransformVector(frustumCorners[1]);
 var topLeft = camtr.TransformVector(frustumCorners[0]);
 var bottomRight = camtr.TransformVector(frustumCorners[2]);

 Matrix4x4 frustumVectorsArray = Matrix4x4.identity;
 frustumVectorsArray.SetRow(0, bottomLeft);
 frustumVectorsArray.SetRow(1, bottomLeft + (bottomRight - bottomLeft) * 2);
 frustumVectorsArray.SetRow(2, bottomLeft + (topLeft - bottomLeft) * 2);

 sheet.properties.SetMatrix("_FrustumVectorsWS", frustumVectorsArray);

 //...
}
We select the correct corner via the vertex coordinates:
v2f Vert(AttributesDefault v)
{
 v2f o;
 //...
 int index = (o.texcoord.x / 2) + o.texcoord.y;
 o.ray = _FrustumVectorsWS[index];
 //...
 return o;
}
And done! When we now look around us the fog stays the same:

If you looked closely you've also seen some height fog in the gifs, I'm still working on that but expect another update soon on that topic :)
02 August 2018
Stylistic fog from Firewatch with Unity's PostFX v2
A friend of mine (Kenny Guillaume) asked me if it would be possible to implement a fog effect as in Firewatch:

The picture above is taken from this video of the GDC 2015 talk on the art of Firewatch, where they explain how they implemented it.
The effect is simple enough: apply fog as a post process effect and for each sample fetch the fog color from a gradient texture. I even copy pasted the gradients from the same video:


My first take on this was a MonoBehaviour where we apply this effect in the OnRenderImage override. While this yielded good results, this is not how things should be done nowadays.
No sir, now we have Unity's PostFX V2 which you can enable via the package manager. I've seen this new library at Unite Berlin and was really impressed by it. It is a well designed system if you ask me!
So the challenge was to incorporate this "stylistic fog" effect (as they called in the Firewatch video, I rather call it "Stylized Fog") into the PostFX V2 system. In a Post Process Profile the settings look like this:

I managed to get this result by consulting the other effects that are available on github (since PostFX v2 is completely open source) and this very nice tutorial on custom effects. Definitely check this manual on the new PostFX system too.
The cool part is that there are only three code files required: a shader, a script and an editor script - wonderful! They really made it super user-friendly to extend their system with custom effects. This is a screenshot of my programmer-art terrain + Stylized Fog with the firewatch gradient applied:

Just imagine what an artist could do with this!
If you plan to use this, be aware that this effect replaces the regular fog in Unity. In other words you need to disable fog in the lighting settings:

Be aware that, since this effect needs the depth buffer, you should not use MSAA, since the depth buffer will have no AA. Instead enable a screen space AA effect to fix this. This is the setting I used for the above screenshot:

Of course I added all this to my Unity Toolset repo, so have fun! I'm eager to receive any feedback on this!
[Edit] I put some extra work into this, as it turned out to be not completely ready, read about it here.
Subscribe to:
Posts (Atom)